
Without a detailed plan, a site migration will almost certainly lead to a drop in rankings and organic traffic. That’s why you need to have a detailed site migration checklist in hand before you begin.
Let’s look at how to plan and carry out a site move the right way.
What is site migration?
Site migration (also known as a “site move”) refers to any essential changes on a website that may impact SEO. Such changes include, but are not limited to:
- domain name change (e.g., from oldwebsite.com to newwebsite.com);
- top-level domain change (e.g., from mywebsite.org to mywebsite.com);
- changing content management system (e.g., from WordPress to Shopify);
- upgrading content management system (e.g., from Magento 1 to Magento 2);
- changing the URL structure (e.g., from …/product-name to …/category/product-name);
- consolidation of content (e.g., merge subfolders …/news and …/articles into …/blog);
- moving from a subdomain to a subfolder or vice versa (e.g., from blog.mybsite.com to mywebsite.com/blog);
- site redesign: updating the website design without changing URLs;
- switching web hosting (e.g., moving to a different hosting provider);
- HTTP to HTTPS, etc.
There may also be hybrid migrations when you combine several changes. For example, you may change your domain name and content management system at the same time.
This complicates the migration process and makes it more difficult to troubleshoot potential technical SEO issues if the migration goes wrong.
In any case, for a successful migration, follow the site migration checklist below.
Site migration planning
Choose an appropriate time
Plan to migrate your website during periods when your site generates the least amount of traffic and/or revenue. This minimizes any potential issues that may occur during the transfer.
Prepare a list of all URLs of the site
Start by crawling your site and preparing a list of all site URLs. This will be necessary to make a list of priority pages.
A list of site URLs should include pages that return the HTTP status code 200 (“OK”), 404 errors (“Not found” pages), and 301 (302) redirects.
This task can be carried out using Screaming Frog SEO Spider.
Set up Google Search Console
Google Search Console is an essential tool for successful site migration. It allows you to facilitate and monitor the migration process.
If you haven’t used Google Search Console before, verify your site and wait a few days for Google to collect all the necessary data for your site.
Prepare the necessary SEO reports
It is recommended to prepare the following reports:
- Pages that generated organic traffic over the past 12 months (use Google Analytics).
- All pages that have backlinks. This is very important: if key backlinks are lost during the migration, your website will almost certainly lose its rankings.
- All indexed pages on Google (use Google Search Console).
- The number of internal links to each page of the website (use the “Links” report in Search Console).
- List of keywords (search queries) the website has positions for (use Search Console or any other SEO tool like SEMrush or Ahrefs).
Export all the necessary reports to Excel and keep them for later use.
Review any configured settings in Google Search Console
Identify sitemaps, crawl issues and/or warnings, check crawl stats, removed URLs (if any), and pages that contain Structured Data.
Prepare URLs of all images
If you move images to a different location during a site migration, be sure to prepare a separate list of URLs for all images. This is especially true for eCommerce sites, as product images are crucial for both SEO and user experience.
Gather site speed information
Page load time and Core Web Vitals affect site conversions. If your new site is slower than the old one, it could result in lower revenue.
That’s why it is important to prepare data about site speed. You can find it in Google Search Console (section “Core Web Vitals”), or use Google PageSpeed Insights.
Make a list of the site’s pages by priority
Now you need to combine data from the SEO reports you have already prepared and make a list of prioritized pages. This is an essential step of the site migration checklist, so be sure to execute it properly.
Prioritized pages are those that are indexed in Google, have more backlinks, and generate the highest organic traffic or revenue.
You can add the following columns to the summary table:
- URL address
- HTTP status code
- status in Google (indexed or not indexed)
- organic traffic
- backlinks
- referring domains
- internal links
The summary table may look like this:
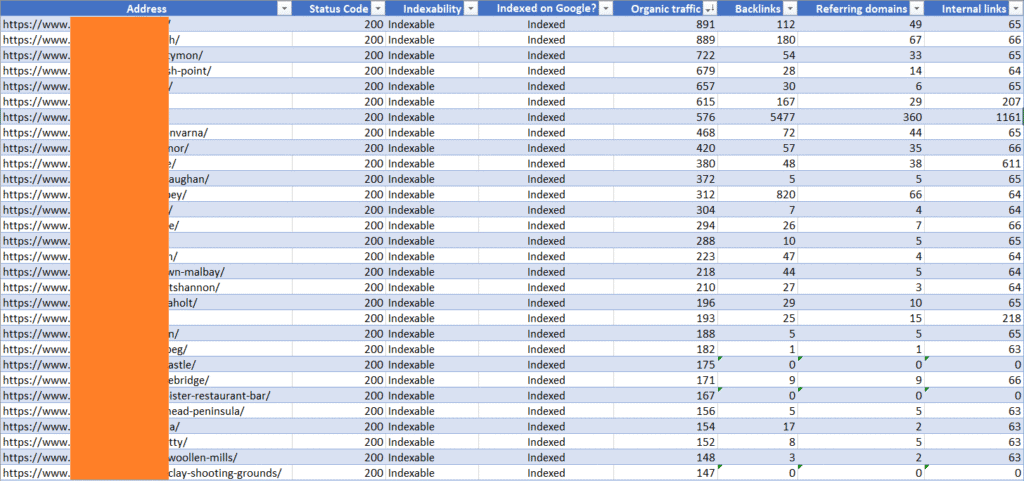
As a result, you will get a list of pages by priority from an SEO perspective.
Prepare a list of landing pages used in your advertising campaigns (if any)
If you run Google Ads or other ad campaigns, make sure to prepare a list of landing pages used in these campaigns. When the new site goes live, you will need to update the ad landing page URLs.
Preparing for site migration
Choose your migration strategy
For small and medium websites, Google recommends moving all URLs at once.
If you have a large website, you can migrate it in parts. This can make it easier to monitor, identify, and resolve possible issues.
Set up a staging site
It is not recommended to make significant changes to your live website until you’ve tested them on a staging site. This is especially true if these changes involve changing URLs.
That’s why it is strongly recommended to set up a staging domain and launch your new website there.
In this article we will not discuss how to set up a staging site – this is a separate topic. Ask your dev team to do this or hire a developer.
Make sure your staging site is blocked from crawling and indexing
Ideally, you should enable HTTP authentication (password protection) for your staging site.
If you cannot do it for some reason, add the 'noindex, nofollow' meta tag to all pages of the staging site. This tag doesn’t prevent 3rd party access but is still a good solution.
Please note: using robots.txt file to disallow crawling of the staging site is not recommended. Google can still index a page blocked in robots.txt if it finds external links to the page.
Create a backup of the old site
Make sure you have a full backup of your old website in case something goes wrong with the new site. This guarantees you can quickly undo the migration if necessary, minimizing downtime and preventing data loss.
Create a redirect map
This is perhaps the most important step in the site migration checklist – the old URLs need to be mapped to the new URLs. 301 redirect map is a spreadsheet that includes the following two columns:
Old page URL → New page URL
Be sure to include the following pages in your URL redirect map:
- all pages that generate organic traffic;
- all pages that have backlinks;
- pages that have a high number of internal links from other pages.
Consider not moving to the new site any URLs that have no backlinks, generate no organic traffic, or are not indexed on Google.
Also, include images and other files if their URLs will be changed during the migration.
The result should be a prioritized list of old URLs and corresponding new URLs, which may look as follows:
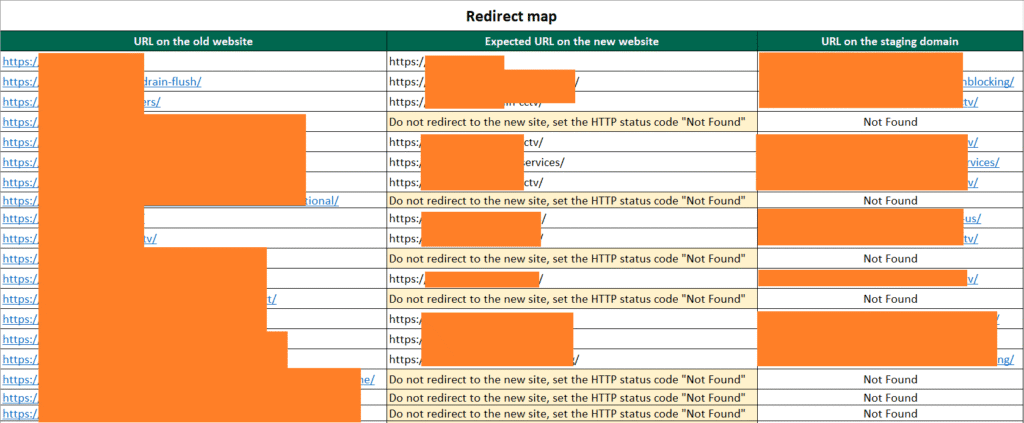
Please note: do not redirect old URLs to irrelevant new URLs, as this can lead to SEO issues, such as soft 404 pages.
Prepare and verify 301 redirects
For priority HTML pages, images, and other files, create and test 301 redirects at the page level.
All URLs you intend to redirect must return the appropriate HTTP response code 200 (“OK”).
Please note: if you have existing redirects on the site, you need to take them into account during the migration. If you don’t, you may lose them or get redirect chains.
Provide correct HTTP status codes for deleted or merged content
All URLs on the old website that will not be moved to the new website must return HTTP status code 410 (“Gone”) or 404 (“Not Found”).
Don’t delete your old site
Once the new site goes live, do not delete the old one immediately. You should keep it for some time (up to a year) to ensure all the ranking signals are transferred to the new URLs.
Check if Search Console is verified
Ensure Search Console is verified after the new site is launched. If verification was lost, you should re-verify it. Where possible, use the same verification method you used for the old site.
Site Migration Execution
Implement redirects
Implement 301 redirects from the old URLs to the new URLs at the page level, as indicated in the redirect map.
This is another essential step in the site migration checklist, so make sure all redirects are set up correctly.
Update your robots.txt file
Check your robots.txt file after launching the new website. Make sure it does not contain directives that disallow the crawling of the old and new URLs.
Also, make sure that search engines can crawl images, CSS, and JavaScript files to render pages correctly.
Use the “Change of address” tool (for domain migration)
If you’ve changed your domain name, let Google know about it using the “Change of address” tool in Google Search Console:
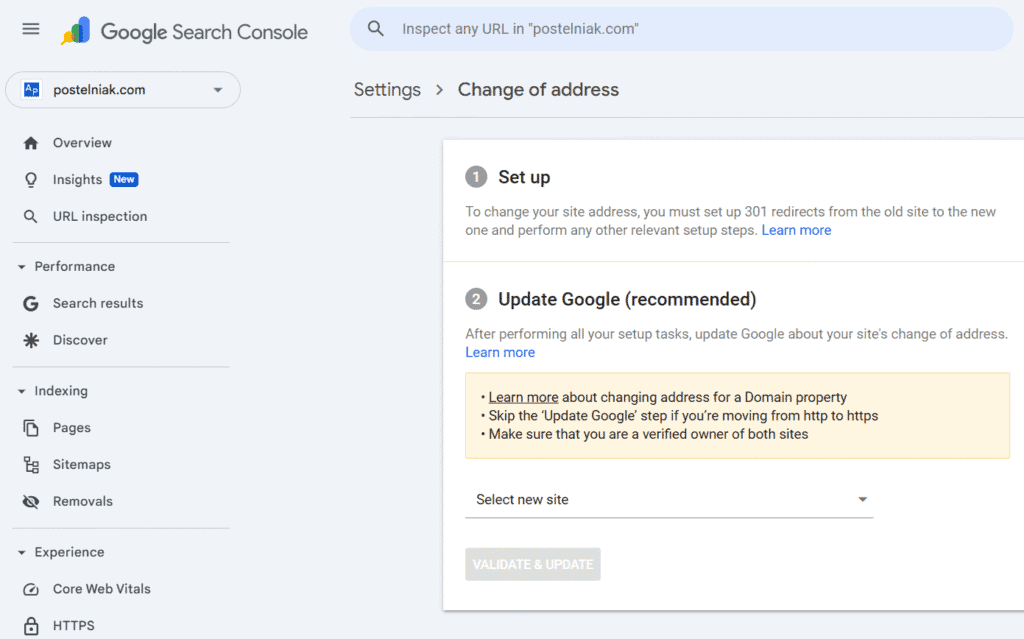
Before using this tool, you must set up 301 redirects from the old website to the new website and verify the new domain in Search Console.
Submit a new XML sitemap
In Search Console, submit the sitemap you created earlier that includes the new URLs.
However, do not delete the old sitemap. This makes it easier for Google to find the redirects from the old URLs to the new URLs, which speeds up the site migration.
Check how Google renders new pages
Use the URL Inspection tool to check how Google renders your new URLs. Ensure Google’s rendering matches what you see in your browser. If pages are not rendered properly or in full, identify and resolve the causes.
Update page titles, meta descriptions, and Schema markup on the new site
Ensure pages of the new site have proper titles and meta descriptions. You can use the titles and descriptions of old pages or write new ones.
As for Schema markup – if old pages had Schema markup, new pages should also have the new equivalent markup.
Check canonical links
Make sure canonical tags on the new website point to the new URLs. If they don’t, this will cause indexing issues and prevent your new pages from ranking.
Update inbound links
If any external links point to URLs that have changed during the migration, update them (Facebook, Instagram, pages used in advertising campaigns, etc).
Keep 301 redirects in place for a year
Maintain redirects until Google has indexed all the new URLs and removed all the old URLs from its index. Google recommends keeping redirects for about a year.
Post-migration monitoring
Check crawl errors and the number of indexed pages
Check Google Search Console regularly for possible crawl issues (section Indexing – Pages). Also, monitor the total number of indexed pages.
If everything went smoothly, you should see that old URLs are gradually being de-indexed and new URLs are being indexed.
Monitor crawl statistics
For this purpose, you may use either Google Search Console (section Settings – Crawl Stats) or server log files.
If Google crawls the new site without any issues, you will not see any crawl problems in the Google Search Console:

Monitor organic traffic and rankings
Your website may experience a temporary decline in organic traffic and fluctuations in rankings. However, if you’ve followed all the steps in the site migration checklist, your organic traffic and rankings should recover.
Recovery happens when Google successfully transfers all ranking signals from the old URLs to the new ones.
This process can span from several days to several weeks for small and medium-sized websites. For large sites, it may take longer.
Common site migration mistakes
Not redirecting old URLs to the corresponding new URLs
The worst mistake you can make during site migration is not redirecting old URLs to new URLs. Without redirects, Google cannot transfer ranking signals from old to new pages, resulting in a significant drop in organic traffic.
That is why creating a redirect map is an integral part of the site migration.
Redirecting many old URLs to a single irrelevant new URL
All redirects from old to new URLs must be relevant. This means that the content of the old page must be similar to the content of the new page.
Avoid redirecting old URLs to a single irrelevant new URL. This practice is called “irrelevant redirects” and negatively affects the ranking of the new website in organic search.
However, you can redirect a few old pages to a new consolidated and relevant page.
Robots.txt file disallows crawling of the new website
When a new site is launched, don’t forget to update its robots.txt file to allow crawling of the entire site.
If your staging site was blocked from crawling in robots.txt, ensure that the new site allows search engines to crawl it.
Pages of the new website contain the ‘noindex’ directive
Your staging site may be blocked from indexing using the 'noindex' directive in a meta tag or in the ‘X-Robots-Tag’ HTTP header.
When a new site goes live, make sure its pages do not have 'noindex' directives.
Incorrect canonical links on the new site
It is also possible that the canonical links were not updated when the new site was launched. They may still point to the old URLs or the staging site.
Make sure canonical links on the new website are correct and point to the new URLs.
Summary
To successfully migrate a website, you need to plan, prepare, and implement the whole process. The duration of this process can vary, taking several days for small websites to several weeks or more for larger sites.
When done correctly, website migration may only result in a temporary drop in organic traffic. However, improper planning and execution can significantly harm your SEO.
I hope this site migration checklist will help you successfully migrate your website.
If your website runs on WordPress, you can take the next step in improving your search performance by reviewing the WordPress SEO checklist.